Thursday, July 31, 2014

Master Bathroom Tiling

The tiling in the master bathroom is just about done.

Shower area with the completed bench (it's made from the same granite as the vanity)
 
Bathtub area
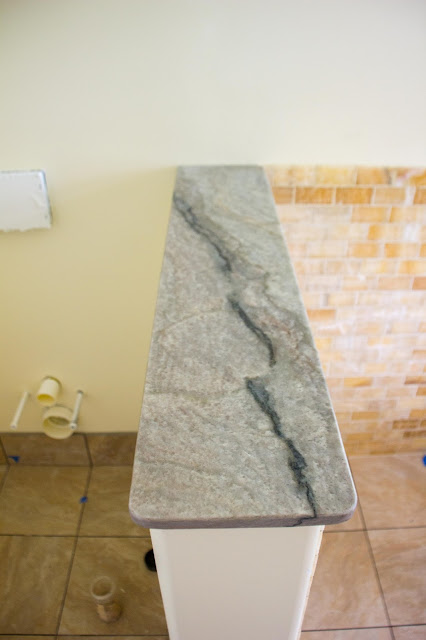
This is a low wall that separates the bathtub area from the toilet. It's also covered with the same granite as the vanity.
We also had our refrigerator delivered.  This is, more or less, what the kitchen will look like when everything is done.

Wednesday, July 30, 2014

Kitchen Granite Done

The last of the granite in the kitchen was installed -- a back splash on the island (the back of the bar).

In the master bathroom, the floor tile is done, and work started on the baseboard.
This is where the vanity will be.

The onyx tile was also put on the bench.

Tuesday, July 29, 2014

Final laundry Room Cabinets Installed

Since the plumber was able to shift the laundry sink water supply and drain pipes a little to the side, the last cabinets could be installed. The laundry tub will go in the right cabinet, and the washer and dryer go to the right of that.

The cabinet is encroaching on the washing machine water supply box a little, but it shouldn't be a problem.
The tile in the master bathroom shower is done.

The wall tile in the tub area is also done.
 We had a visitor come up the driveway and wander around the yard for a little while. There are plenty of wild pigs on the island, but we've never seen one in our area before, and this one does not really look wild -- it looks more like an escaped pot belly pig.

Monday, July 28, 2014

Master Shower Floor

The tiling of the master shower floor is about two-thirds done. Here, we're using quarter size tiles place on the bias to create a distinct area.


We used the rounded edges cut off the back splash pieces to make window sills for the kitchen and dining room windows.
Kitchen
Dining room


Friday, July 25, 2014

Dining Room Granite Done

The granite in the dining room is done. As in the kitchen, the granite back splash goes all the way to the wall cabinets.

The island is ready for the cook top.  (We're not sure yet if this top drawer will be useable -- it might be useable with some modification, depending on the thickness of the cook top).

Wednesday, July 23, 2014

Master Bathroom Floor

Most of the floor in the master bathroom is done.

Looking into the bathroom from the doorway
Bathtub area
The vanity will be installed on the wall to the left

Tuesday, July 22, 2014

Master Bathroom Tiling

The tiling in the master bathroom is progressing.

Shower
Bathtub area
Bathtub area (with view of rainforest outside the window)

Thursday, July 17, 2014

Kitchen Granite Almost Done

The granite work in the kitchen is nearly done.
Kitchen cabinets and sink with full back splash

Island and bar
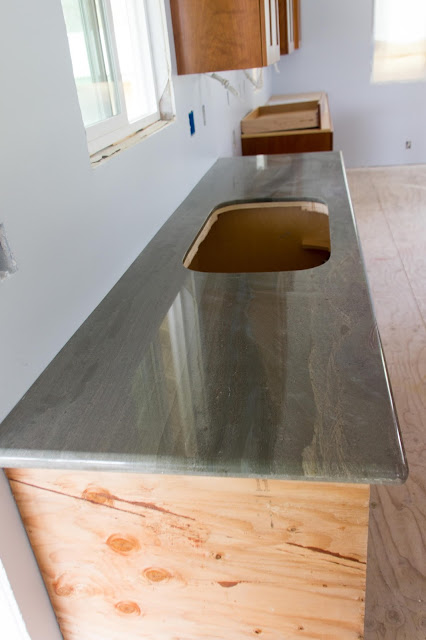
Island and bar from the side, looking towards the breakfast nook (on the right) and out the front door (on the left)
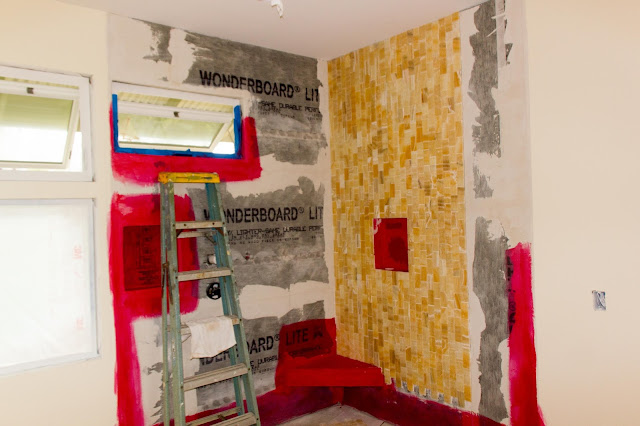
 Tiling has started in the master bathroom. We're using a natural onyx subway tile, installed vertically in the shower (it's a little hard to see in the photo, but the red square in the middle of the wall is a recessed shelf covered with Redguard).


Friday, July 11, 2014

Granite and Master Bathroom

The sink and two more pieces of granite are installed in the kitchen and dining room.

The hole for the cook top has been (mostly) cut out, but not removed yet.


First piece in the dining room. The pre-fab pieces area little too short to cover the entire span, so we'll have to use a piece cut off from the kitchen.
 In the master bathroom, all of the areas where water might accumulate were given a couple of coats of Redguard (a water-proofer).

A free-standing tub will go in the space to the left.

Thursday, July 10, 2014

More Granite Work

The first piece of granite is in. The hole has to be cut for the sink, then the edges are smoothed and polished.


View from the side looking into the dining room
This is where the cook top will go. The oven will be to the left.


Wednesday, July 9, 2014

Granite and Tile Work

The granite installer continued getting the granite ready for installation in the kitchen.
This slab that will be installed in the kitchen, where the sink goes. A large section is cut out for the sink, so to reinforce the granite, grooves are cut on the bottom near the edges, steel bar is put in the grooves, and they are filled with epoxy.


Closeup of the steel bar before the epoxy is put in
 The tiling work is also continuing in the bathroom shower.

And the bench in the master bath shower was put in.

Tuesday, July 8, 2014

Granite Work Begins

The granite installer brought the kitchen and master bath granite and started working on installation. There is a total of seven slabs--six for the kitchen and one for the master bath. The slabs are prefabricated, i.e., they are cut to standard size, polished, and have rounded edges, but they still need to be cut to size for each location and have holes cut for sinks, outlets, etc.

This is the granite that will go in the kitchen

Monday, July 7, 2014

Plumbing Fix and Cement Board in Master Shower

The plumber came and, with a minimum of cutting into the wall, was able to shift the water pipes and drainpipe just enough so that cabinet can be installed. Once the hole is patched, the base cabinets on this side can be installed.  This is one of the advantages of using PEX plumbing, which has some flexibility.
New hole in the wall. They're hard to see, but there are two capped water supplies pipes (painted white) and a drainpipe (the wire is for an under-cabinet light).
 The cement board was installed on the master bath walls, and now this room is also ready for tiling.

Thursday, July 3, 2014

Bathroom Shower Tiling

The first tiles were installed in the bathroom shower.
Doesn't look like much of anything yet ...

Wednesday, July 2, 2014

Master Bath Shower Pan, Office Painting

To create a sloped floor for the master bath shower area, we installed plywood and cement board in the area around the shower to raise the height of the floor.
Next, a plastic shower pan liner is installed to cover the entire shower area. With the liner installed, any water that gets onto the liner will drain  into the shower drain.
Next, mortar (which is essentially concrete without the gravel) is put on top of the liner and gently sloped from the edges of the shower on all sides to the drain.
This is the finished mortar surface, ready for tiling (once is dries). The slope is very gentle, but it's enough to get the water to drain.


I've been doing more interior painting, this time the upstairs office. It's a mossy green.

Front
Side, with the front to the left and the stairs to the right
The back, with the stairs behind the short wall
The view down the stairs
The view from the bottom of the stairs